Why look! Another guest blogger! This time it’s Neely Quinn, the pint-sized dynamo who runs The Paleo Plan!

Mel, Holly, and I met Neely last fall when she attended our Do It Better! Paleo Seminar in Estes Park, Colorado. Not too long ago, she reached out to me and volunteered to guest post about making a super-simple two-ingredient dairy-free yogurt in the oven. That’s right: TWO INGREDIENTS. The technique was so novel and easy that I had to take her up on her offer. Teach us, Neely!
Luckily for me – but very unfortunately for her – my friend Cat Caruso has so many food sensitivities that she has to be creative in the kitchen.
Cat’s culinary accomplishments range from the most perfect coconut macaroons ever created, to a tender delectable crock-pot lamb roast, to coconut milk ice cream, and last but not least…coconut milk yogurt.
Obviously, her food sensitivities don’t extend to coconut.
Why had I not thought of coconut milk yogurt before!? Sometimes when she tells me what she’s just whimsically whipped up, I feel really stupid for not having done it before myself.
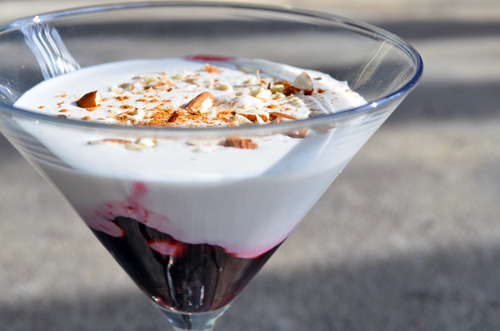
Not only is coconut milk yogurt a fantastic idea, it’s really delicious. It’s tangy, creamy, and satisfying like yogurt should be. One thing to note is there’s pretty much no protein in it, so you’ll have to get your grams somewhere else.
What You’ll Need for 2 servings:
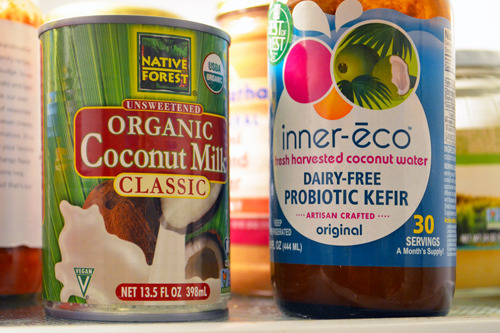
- 1 can 13.5 oz full fat coconut milk (Organic Native Forest is great)
- 1 tablespoon Inner-Eco fermented coconut water probiotic kefir or 1 capsule of any probiotic to use as your starter
- A lidded glass jar big enough to hold the contents of the can of coconut
- An oven that’s free for up to 24 hours
Directions:
Step 1: Refrigerate Your Canned Coconut Milk (Optional).
Not the watery stuff in the carton: the full fat stuff in the can. Native Forest is a good brand because they don’t use BPA in the linings of their cans. If you want thicker yogurt, refrigerate the can (don’t shake it up) for at least a few hours so that the cream rises to the top.
Then, just use the cream and not the water at the bottom of the can. If you don’t want to waste the water at the bottom of the can, you can always put it in a smoothie or…drink it?
I use the entire can of coconut milk – water and all – because I don’t mind if my yogurt is a little thin. One might even call it “runny”. By the way, the amount of yogurt you get from this recipe is equal to the amount of coconut milk you use. So if you use an entire 13.5-ounce can, you’ll get the whole 13.5 ounces, or about 1¾ cups.
Step 2: Combine Ingredients.
Yes, there are only 2 ingredients – whoopee! Place the coconut milk, or just the cream if you choose, into a sterilized glass jar with either the tablespoon of Inner-Eco or the contents of the probiotic capsule. If you’re working with the probiotic capsule, just open it up and dump in the powder. Then mix it up with a plastic or metal spoon.
Step 3: Wait.
Put the sealed jar of yogurt in the oven with the light on. DO NOT TURN THE OVEN ON. Just close the oven door and turn on the oven light. Even in the midst of a freezing cold winter in Colorado, the closed oven and the light generate a stable temp of about 105-110°F, perfect conditions for the coconut milk to incubate.
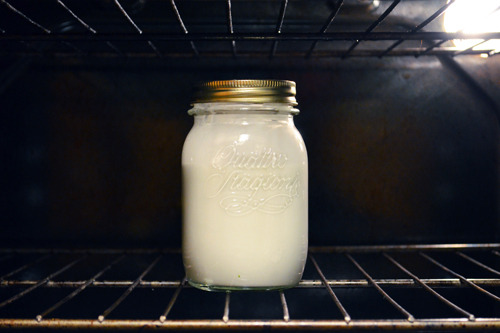
You could also put it in a cooler with a heating pad in the cooler or covering it. The longer it sits, the more yogurt-y it becomes, so I leave mine in for 24 hours. Normally, you’d let dairy milk sit for 7 hours after heating it up on the stove to get it to that 110°F, but I’m using a shortened preparation process here because we’re all busy. It’s not necessary to heat up either dairy milk or coconut milk before letting it incubate. More questions about making yogurt in general? Check out Cultures for Health or How To Make Yogurt.
If you’re squeamish about leaving things out unrefrigerated, just remember that this is how that grocery store yogurt is actually made – by letting it sit in a warm-ish place. The same goes for buttermilk, kefir, and all other deliciously tangy fermented things.
Suggestions for Use
You can do so many things with this yogurt! The same things you’d do with normal yogurt, like eat it plain, put it in a smoothie, put some berries or nuts in it, blend it up with a bit of banana for an extra creamy consistency, make an Indian yogurt sauce – the options are limitless.

I personally like to mix it with unsweetened applesauce and some berries. That combo has a really nice consistency and the applesauce gives it that sweetness I’ve always associated with yogurt. I hope you enjoy this recipe as much as I do. Let us know in the comments how it turns out!
Neely is a nutrition therapist who works at PaleoPlan.com, which is a Paleo meal planning service, among other things. At Paleo Plan she sees clients, writes, answers people’s Paleo questions, and does marketing. She’s seen amazing health and athletic improvements in herself since she started eating Paleo in 2009, and has passionately endorsed it since then. She lives in Boulder, CO with her husband, where she rock climbs and enjoys the mountains on a regular basis. To read her full bio on Paleo Plan, go here.


Is there a specific probiotic strain that I have look for when buying probiotic to make the yogurt?
Thank you
No, I do not have a specific strain.
Thank you thank you, thank you again for your YEARS of wonderful work. I so appreciate!!
Now, my question:
I was just reading a recipe [on Serious Eats] for Spaghetti Puttanesca aka Pasta Puttanesca.
And of course wondered if you would do your version of this great, yum recipe. A GF version, with a recommended past, please. Please!!
Also, I noted that theirs claims— are you ready: 600 + calories per serving [unless I misread.]. YIKES
there must be a way to cut that down.
Way down!!!
Again. many thanks,
Ruth